 Ballista
How a Trajectory Really Works: Bore Line, Line of Sight and the Two Crossings
Why a bullet crosses your line of sight twice but never rises, where the two crossings fall for a 100 and a 200 yard zero, and why changing the zero shifts every come-up by the same angle.
Zero a 6.5 Creedmoor at 100 yards and the bullet crosses your line of sight twice: once on the way up, at about 64 yards, and again at 100 yards on the way down. Between the two crossings it’s never more than 0.08 in above the crosshair. Measured against the barrel, though, the bullet never goes up at all. At 100 yards it’s already 2.5 in below the line the bore was pointing along. Once you see the three lines involved, zeroing, holdover and come-ups stop being separate rules and become one picture.
Three lines: bore, sight and bullet
The line of sight runs from your eye through the center of the scope to the target. It’s straight, and every number on a DOPE card is measured from it.
The bore line is where the barrel points. It starts below the scope by the sight height, 1.6 in on this rifle, and it’s tilted slightly upward. Zeroing is nothing more than setting that tilt. For a 100 yd zero the bore points 3.87 MOA above the line of sight. For a 200 yd zero it points 5.62 MOA above it.
The trajectory starts on the bore line and falls away from it from the first inch of flight. Because the bore is tilted up, the bullet climbs relative to the line of sight for a while even though it’s falling relative to the barrel.
Why the bullet never rises
Gravity starts working the moment the bullet leaves the case. Relative to the straight line it was launched along, the bullet falls by about ½·g·t², where t is the time of flight so far. The table puts the engine’s numbers next to that schoolbook formula.
| Range, yd | Bore line above sight line, in | Bullet vs sight line, in | Bullet below bore line, in | Time of flight, s | ½ g t², in |
|---|---|---|---|---|---|
| 25 | -0.59 | -0.74 | 0.15 | 0.028 | 0.15 |
| 50 | 0.43 | -0.18 | 0.60 | 0.056 | 0.61 |
| 64 | 0.99 | 0.00 | 0.99 | 0.072 | 1.00 |
| 82 | 1.72 | 0.08 | 1.64 | 0.093 | 1.66 |
| 100 | 2.45 | 0.00 | 2.45 | 0.114 | 2.49 |
| 200 | 6.50 | -3.67 | 10.17 | 0.234 | 10.54 |
| 300 | 10.55 | -13.21 | 23.77 | 0.360 | 25.08 |
The “bullet below bore line” column grows with the square of the time, exactly as a dropped stone does. It runs a little under ½·g·t² farther out because drag on a descending bullet has a small upward component. What the bullet does relative to the crosshair is the difference between two lines: the bore line climbing at a fixed angle and the bullet falling ever faster beneath it. Close to the muzzle the climb wins and the bullet appears to rise. Past the top of the arc the fall wins.
This is also why “the bullet rises out of the barrel” can’t be true in the way it’s often told. A rifle fired with the bore perfectly level would put the bullet below the bore line at every range. The rise exists only relative to a line of sight that you tilted the barrel against.
Where the two crossings fall
The near crossing and the zero are a pair. Choose one and the rifle’s velocity, ballistic coefficient and sight height set the other. With 1.6 in of sight height:
- 100 yd zero: the bullet comes up through the line of sight at 64 yd, peaks 0.08 in high at 82 yd and crosses again at 100. Between 64 and 100 yd the path is flat to within a tenth of an inch. The .308 is almost identical: up through the line at 63 yd, peaking 0.10 in high.
- 200 yd zero: the near crossing moves in to 31 yd and the top of the arc rises to 1.9 in at 117 yd.
That pairing is the idea behind short-range zeroing shortcuts such as “zero at 50 and you’re on at 200”. The shortcut is only as good as the rifle it was worked out on. On this 6.5 Creedmoor a 50 yd zero crosses back down at 127 yd, not 200, and a 25 yd zero comes back down near 250 yd. The 200 yd zero’s own near crossing is at 31 yd. Sight height and velocity move the pair, and the sight height article shows how far.
There’s a second problem with zeroing short. A zero is an angle. If your group center is 0.2 in off at 25 yd, that’s 0.76 MOA, which becomes 0.8 in at 100 yd and 8 in at 1,000. Use a short range to get on paper, then confirm the zero at the distance you’ll use.
100 or 200: the zero only rotates the trajectory
Here are both zeros side by side, out to 1,000 yd.
| Range, yd | 100 yd zero: path, in | 100 yd zero: come-up, MIL | 200 yd zero: path, in | 200 yd zero: come-up, MIL | Difference, MIL |
|---|---|---|---|---|---|
| 50 | -0.2 | 0.10 | 0.7 | -0.41 | 0.51 |
| 100 | 0.0 | 0.00 | 1.8 | -0.51 | 0.51 |
| 150 | -1.1 | 0.21 | 1.6 | -0.30 | 0.51 |
| 200 | -3.7 | 0.51 | 0.0 | 0.00 | 0.51 |
| 300 | -13.2 | 1.22 | -7.7 | 0.71 | 0.51 |
| 400 | -29.3 | 2.04 | -22.0 | 1.53 | 0.51 |
| 500 | -52.8 | 2.93 | -43.6 | 2.42 | 0.51 |
| 600 | -84.6 | 3.92 | -73.6 | 3.41 | 0.51 |
| 800 | -177.4 | 6.16 | -162.7 | 5.65 | 0.51 |
| 1,000 | -318.5 | 8.85 | -300.2 | 8.34 | 0.51 |
The last column is the point. From 300 to 1,000 yd the come-up for the 100 yd zero is larger by the same 0.51 mil at every range (identical to the thousandth of a mil). That’s the difference between the two bore angles: 5.62 − 3.87 = 1.75 MOA. Moving the zero doesn’t change the shape of the trajectory. It turns the bore line through a fixed angle and the whole path turns with it.
Two practical consequences follow:
- Switching zeros is a constant offset. If you dial from a 200 yd zero and someone hands you 100 yd zero come-ups, subtract 0.51 mil (1.75 MOA) from every row. You don’t need a new table.
- The path numbers are not interchangeable. The inches column changes by a growing amount with range (9.2 in at 500 yd, 18.3 in at 1,000) because a fixed angle covers more inches farther out. Holdover in inches depends on the zero. Corrections in MIL or MOA differ only by the offset.
Many long-range shooters zero at 100 yd for a simpler reason: wind, mirage and velocity spread move the group least at 100, so the zero itself is the most precise. Hunters who hold rather than dial often prefer 200 yd: the bullet never rises more than 1.9 in above the crosshair and is only 3.1 in low at 250 yd. The point-blank range article works through that trade.
Seeing the arc in the app
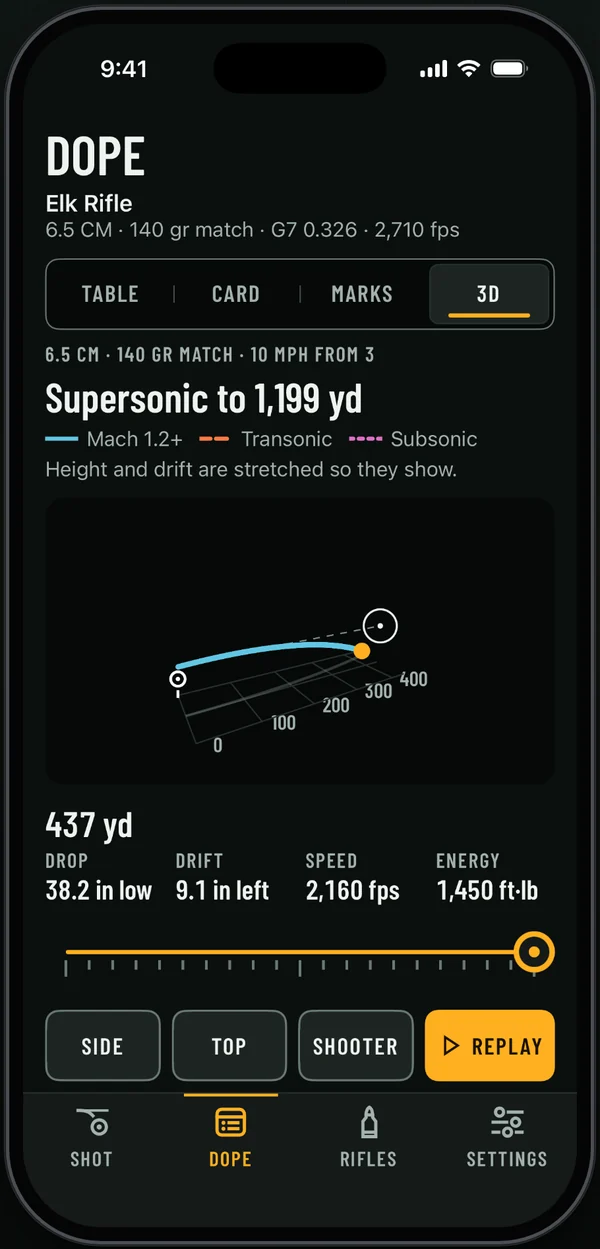
Ballista’s DOPE tab has a 3D view that draws this picture for your own rifle: the line of sight as a dashed line and the bullet’s arc colored by speed, with the height and drift stretched so they show. Side, Top and Shooter buttons turn the view, and Replay flies the shot again. The Side view is the diagram above for your zero and your load.
What to take to the range
- Measure sight height from the center of the bore to the center of the scope. It sets the near crossing and every close-range hold.
- Zero at the distance you’ll actually use, or confirm a short-range zero there. A small error at 25 yd grows in proportion to range.
- If you change zero distance, shift every come-up by the difference in bore angle (0.51 mil between 100 and 200 yd on this rifle). Don’t reuse inch-based holdovers.
- Remember that a crosshair on target with a 100 yd zero means the bullet is within about 0.1 in of it from 64 to 100 yd, and below it everywhere else.
Sources
- Robert L. McCoy, Modern Exterior Ballistics, Schiffer Publishing, 1999. The point-mass trajectory model.
- Bryan Litz, Applied Ballistics for Long-Range Shooting, 3rd ed., Applied Ballistics LLC, 2015. Sight height, zero range and trajectory basics.
- Every number in this article: Ballista engine (BallistaCore point-mass solver), inputs in the box above. See how we compute.