 Ballista
Holding with a Reticle: MIL and MOA Grids, First and Second Focal Plane
Holdover tables for a 6.5 Creedmoor and a .308 in MIL and MOA, what a second focal plane reticle does to every hold when you turn the power down, and when holding beats dialing.
Turn a second focal plane scope from 20× down to 10× and every mark in the reticle doubles in size. A 6.5 Creedmoor needs 3.9 mil of elevation at 600 yards. At 10× the right hold on that reticle is 2.0 mil. Hold the 3.9 you remember and the bullet goes 85 inches high. A first focal plane reticle can’t make that mistake. A second focal plane reticle makes it easy, and the cure is one number you have to know about your scope.
Holding is aiming with the reticle as a ruler
A grid reticle is a ruler in angle. On a MIL grid each mark is a milliradian, 3.6 inches at 100 yards. On an MOA grid each mark is a minute of angle, 1.047 inches at 100 yards. To hold, you take the correction your solver gives in the reticle’s unit, find that point on the grid, and put it on the target. The bullet drops onto the target because the bore is now pointed that far above it.
Holding needs the come-up in the same unit as the reticle. A MIL grid with MOA turrets works for dialing, but mixing units at the moment of the shot is how holds go wrong. Keep the solver, the turrets and the reticle in one unit.
| Range, yd | 6.5 up, MIL | 6.5 up, MOA | 6.5 wind, MIL | .308 up, MIL | .308 up, MOA | .308 wind, MIL |
|---|---|---|---|---|---|---|
| 200 | 0.5 | 1.75 | 0.3 | 0.6 | 2.00 | 0.4 |
| 300 | 1.2 | 4.25 | 0.5 | 1.4 | 5.00 | 0.7 |
| 400 | 2.0 | 7.00 | 0.6 | 2.4 | 8.25 | 0.9 |
| 500 | 2.9 | 10.00 | 0.8 | 3.5 | 12.00 | 1.2 |
| 600 | 3.9 | 13.50 | 1.0 | 4.8 | 16.50 | 1.5 |
| 700 | 5.0 | 17.25 | 1.2 | 6.2 | 21.50 | 1.9 |
| 800 | 6.2 | 21.25 | 1.4 | 7.9 | 27.00 | 2.2 |
| 900 | 7.4 | 25.50 | 1.7 | 9.8 | 33.50 | 2.7 |
| 1,000 | 8.8 | 30.50 | 1.9 | 11.9 | 41.00 | 3.1 |
These are the numbers to hold for each rifle, rounded to 0.1 mil and 0.25 MOA, a practical reading step on a grid. Rounding to 0.1 mil leaves at most 0.05 mil of error, 1.8 in at 1,000 yd. Rounding to 0.25 MOA leaves at most 0.125 MOA, 1.3 in at 1,000 yd. Both are smaller than a 1 mph wind miscall, which moves the 6.5 6.8 in at 1,000 yd.
The wind columns are the hold for a 10 mph full-value crosswind on its own. Scale them with your wind call, the way the wind drift article explains. Spin drift is left out of the wind column; for the 6.5 at 1,000 yd it needs another 0.21 mil of hold to the left.
First and second focal plane
The reticle sits in one of two places inside the scope.
First focal plane (FFP). The reticle is in front of the magnifying lenses, so it grows and shrinks with the image. A mark covers the same angle on the target at every power. A 3.9 mil hold is 3.9 mil at 8× and at 25×.
Second focal plane (SFP). The reticle is behind the magnifying lenses. It looks the same size at every power while the target grows and shrinks behind it. The marks are true at one power only, the design power named in the scope’s manual. Below it each mark covers more angle; above it, less. One printed mil covers design power ÷ current power true mils.
That ratio scales every hold, elevation and wind alike. Here it is for the 6.5 Creedmoor at 400 and 600 yd, through a scope whose marks are true at 20×.
| Power | 1 printed mil covers, true mil | Hold at 400 yd, printed mil | Hold at 600 yd, printed mil | Miss at 400 yd if you hold the true number, in | Miss at 600 yd if you hold the true number, in |
|---|---|---|---|---|---|
| 20× | 1.00 | 2.0 | 3.9 | 0 | 0 |
| 18× | 1.11 | 1.8 | 3.5 | 3 | 9 |
| 16× | 1.25 | 1.6 | 3.1 | 7 | 21 |
| 14× | 1.43 | 1.4 | 2.7 | 13 | 36 |
| 12× | 1.67 | 1.2 | 2.3 | 20 | 56 |
| 10× | 2.00 | 1.0 | 2.0 | 29 | 85 |
| 8× | 2.50 | 0.8 | 1.6 | 44 | 127 |
The error grows with both the come-up and the range, so it hides at short distance and punishes at long distance. Even a small slip matters: at 18× instead of 20× the 600 yd hold lands 9 in high. That’s enough to miss a 12-inch plate.
There are two clean ways to hold with an SFP scope:
- Shoot at the design power. Everything in the holdover table is then true. This is the simple choice.
- Shoot at half the design power and halve every hold. On a scope true at 20×, at 10× each printed mil is worth 2. A 3.9 mil come-up becomes a 2.0 mil hold. This trick doubles the reach of the reticle when the come-up is larger than the grid, at the cost of doing arithmetic under pressure.
Any other power needs a calculated hold. If you don’t know your design power, check the manual. It is often the highest power, but not on every scope.
Hold or dial
Dialing puts the reticle center on the target with the correction in the turret. Holding leaves the turret at zero and uses the grid. Each has a clear job.
Dial when you have time and one distance. The center of the reticle is the finest aiming point you have, and the shot is aimed exactly where the solver says. A 0.1 mil click is as fine as a careful reticle reading.
Hold when time or targets change faster than you can dial. Two plates at 400 and 600 yd need 2.0 and 3.9 mil for the 6.5. Holding moves between them in the time it takes to shift your aim; dialing needs 19 clicks of 0.1 mil each way. A follow-up shot after a miss works the same way: hold off the impact you saw instead of dialing a correction.
Hold the wind, dial the elevation is the common split for long-range targets. Elevation is known once you have a range, so you dial it. Wind changes during the string, so you hold it on the horizontal stadia and correct shot to shot.
Holding has its own failure: it leaves the elevation in your head instead of on the turret. After a hold you can’t look down and confirm what the rifle was set to. Write the hold down if you need to report or repeat it.
Ballista’s HOLD screen
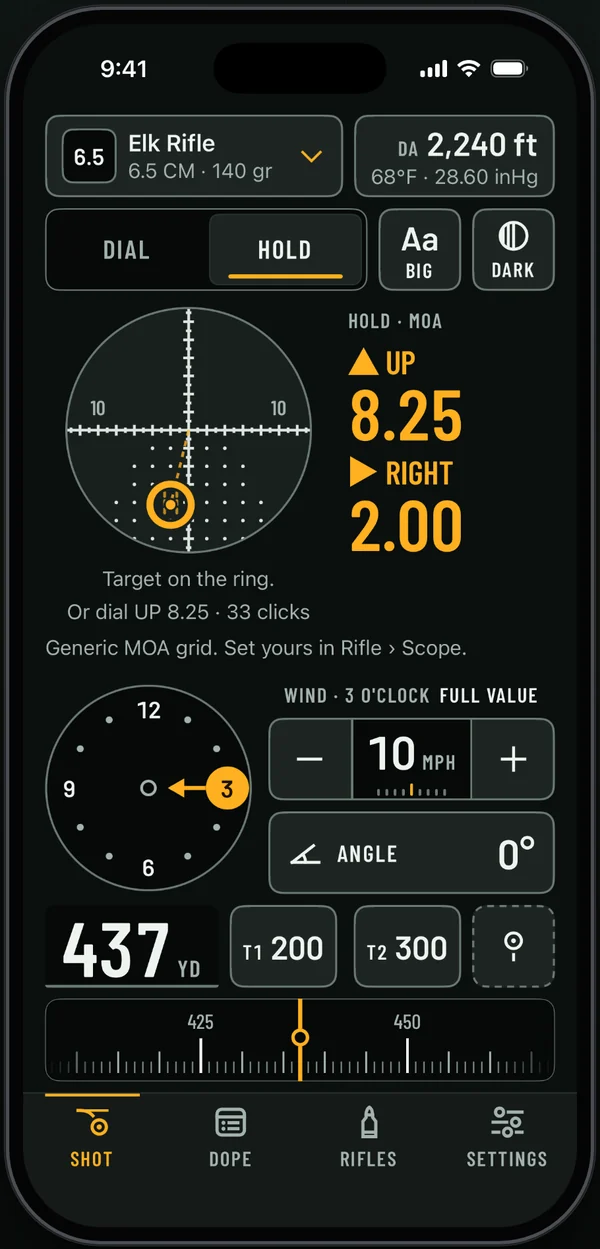
On the Shot screen, HOLD draws your reticle with a ring at the hold point and the hold in numbers beside it, rounded to 0.1 mil or 0.25 MOA. The line under the reticle gives the dial alternative for the same shot. For a second focal plane scope you enter the power the marks are true at (“Holds true at” in the rifle’s scope settings). HOLD then shows the power you’re on, in a warning color when the marks aren’t true at it, with keys to step it up or down, and scales the hold point and numbers to that power, so the ring is always on the right mark. The Marks view on the DOPE screen turns the same solution around: it labels each mark of the reticle with the distance it’s the hold for, in today’s air.
A routine for holding
- Put the solver, the turrets and the reticle in the same unit.
- If your scope is SFP, find the design power in the manual and write it on the scope cap. Hold only at that power, or at exactly half of it with every hold halved.
- Carry a holdover card for your load at 100 yd steps, like the table above. Interpolate between rows: past 600 yd the 6.5’s rows are 1.1 mil or more apart.
- Dial elevation for a single long shot. Hold for several targets, fast follow-ups, and the wind.
- Confirm on steel at two distances. If both are right at the design power, your holds are right.
Sources
- Pure geometry: 1 mil = 3.6 in at 100 yd; 1 MOA = 1.047 in at 100 yd; SFP subtension scales with design power ÷ current power.
- Every trajectory number in this article: Ballista engine (BallistaCore point-mass solver), inputs in the box above. See how we compute.